

This year we have been putting a lot of focus on our backyard, taking it from an empty dirt lot to a place our whole family can enjoy! We knew we wanted a large concrete patio with different areas to hang out in. My kids’ only request was a spa and I was completely onboard with that so designing the spa area of our backyard was the first thing on the list!
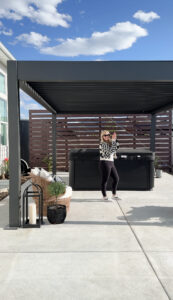
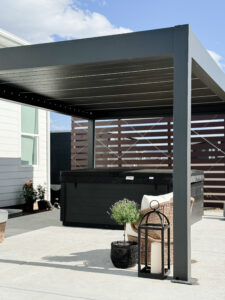
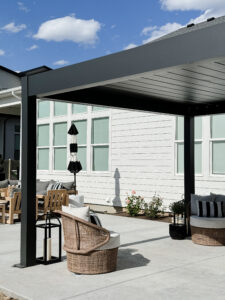
There were a few things that we needed to make the space beautiful, functional, and comfortable. First was a covering, I wanted us to be able to enjoy the spa no matter the weather, sun or snow, so we added this amazing pergola. We have the 13’x19′ Skydance in black. The top opens and closes with a remote, has LED lights, and a water tight roof! The assembly was easier than we thought it would be and the quality is unmatched by anything we have ever owned previously. This is a structure that will last the test of time.
Next we decided to build a slat wall behind the pergola. I chose this project for a few reasons. It creates separation from the RV pad on the side of our house, it adds privacy from future homes that will be build around us, and it’s a beautiful addition to our garden, especially once the wall is covered with Clematis on the trellis we installed! This project took us about 3 days and made a huge impact!
Supplies Needed:
Flowering vine like Jasmin or Clematis of your choice
Setting the posts:
First you will need to set your redwood posts in the ground. Before you can do that you want to treat the bottom portion of the post that touches the dirt with wood protectant. This will protect the wood from the dirt and water in the ground. We treated the bottom 30″ since that’s how far down into the ground we set our posts. Then dig your holes, 3 times as wide as the post, set the posts level in the holes, and fill with 2-3 bags of concrete per post. We set the first 2 posts on the end and then ran a string line in-between the two to easily line up the middle posts. We used quick set concrete and let it sit about half a day until we attached the slats to the post ensuring to insure they were dry.
Attaching the slats:
We used 1″x4″ pine boards and attached them to the posts with 2″ spacing. You can make the gap bigger or smaller as you like but keep in mind where you live. If you get high winds keep the gap 2″ or larger, otherwise this wall may turn into a sail and could cause quite a problem! We first tacked up the boards with a nail gun then re-inforced them with exterior screws to secure them in place. (TIP: Using a spacer is the easiest was to keep your gaps the same size.) Once they were attached we cut off the extra wood on the sides and top for a clean, even wall.
Staining the wall:
We used Behr all weather outdoor deck stain on the slat wall in the color Mahogany. You can get it in a sold or semi-trasparent stain. If you want to see the wood grain I suggest the semi-transparent. I wanted more of a painted look without the wood grain showing through so I went with the solid. It goes on easy with a brush and paint roller and was one coat coverage! This stain can last up to 25 years!
Adding a trellis:
This part is optional but in my option it takes the project next level! We bought a DIY Trellis kit and installed it on the face of the slat wall. It’s such a smart system and went together perfectly! You can customize the design and shape you want your vines to grow in and I’m excited to see my Clematis cover the trellis!
We have so much more planned for our backyard this season and this is just the beginning!
-Grey Birch Designs-


