


If you’ve ever had a room with a weird soffit that drives you crazy, you’re not alone! For the past year, I’ve been staring at one in my daughter’s bedroom, wondering how to make it blend into the space rather than sticking out like a sore thumb. Since removing it wasn’t an option due to the plumbing inside, we decided to get creative and work it into a custom built-in design using IKEA bookshelves, shiplap, and some good old-fashioned DIY magic.
The result? A functional and beautiful built-in unit that looks like it was always meant to be there. If you’re into DIY projects, IKEA hacks, or interior design, this is one transformation you don’t want to miss!
Step 1: Building the Base Frames for the Built-In Bookshelves
The first step in this IKEA hack was to create a solid base for the bookshelves. We built two base frames and secured them to the wall studs on either side of the bed. This not only ensured stability but also raised the bookshelves to a more custom built-in height.
Once the bases were in place, we positioned three IKEA bookcases on each side and attached them to the wall using L-brackets for extra security. These bookshelves served as the foundation for our new built-in storage system.

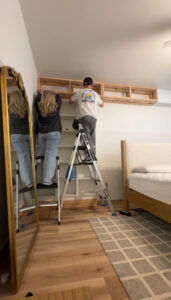
Step 2: Addressing the Awkward Soffit with a Custom Frame and Shiplap
Now, onto the real challenge: that awkward soffit. Since removing it wasn’t possible, we decided to make it look intentional rather than like an afterthought. We built a frame matching the depth of the bookshelves, attaching it to the soffit and extending it across the wall.
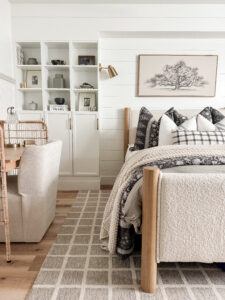
To give it a polished, cohesive look, we installed 8-inch wide shiplap boards across both the frame and the soffit, making it appear as one continuous built-in unit. To further enhance the seamless design, we continued the same shiplap down the back of the wall between each bookcase. This simple addition made a huge visual impact, instantly elevating the entire space.


Step 3: Adding Trim, Molding & Paint for a Custom Look
Once the shiplap was in place, we framed out the top of each bookcase using MDF boards to create a more finished, custom look. Then, we filled all the nail holes and seams, making everything smooth and ready for paint.
For the color, we chose Pure White by Sherwin-Williams in a satin finish. This kept the space light, bright, and modern, while also helping the built-in blend seamlessly with the rest of the room.
To complete the built-in, we added new baseboards, trim, and molding around the shiplap for that final polished touch.

Step 4: Installing Stylish & Functional Finishing Touches
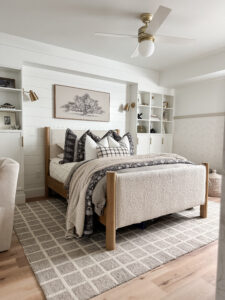
Now for my favorite part—the finishing touches! We installed doors on the bottom half of the bookcases, providing hidden storage for toys, books, and other items.
For lighting, we opted for these stunning battery-operated sconces that are controlled with a remote—no hardwiring needed! This was a simple way to add ambiance without having to deal with electrical work.

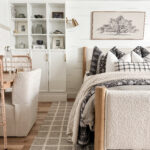
The Big Reveal: A Built-In That Looks Like It Was Always Meant to Be!
Looking back at the before and after, I can’t get over how much of a difference this built-in made. That once-awkward soffit now blends seamlessly into the design, and the additional storage has been a game-changer for our daughter’s room.
This project solved two major problems:
1. Making the soffit look intentional instead of like an afterthought.
2. Creating much-needed extra storage in a stylish and functional way.
Why This IKEA Hack Works for Any Home
If you have an awkward soffit, a blank wall, or just need extra storage, this IKEA hack is a perfect solution. By combining affordable IKEA bookshelves, simple framing, and shiplap, you can create a custom built-in that looks high-end without the high-end price tag.
So, if you’re feeling inspired to tackle your own DIY home improvement project, this is your sign to go for it! Have you ever done an IKEA hack or a built-in project like this? Share your experience in the comments—I’d love to see what you’ve created!
Links for this room can be found HERE!
Ikea bookcases we used can be found HERE!


