DIY Projects

Seasonal Decor

Recipes

Search by Category:

here you can search the blog posts by category. If you are looking for something specific, you can use the search bar.

Kitchen Faucet Update

Design Tips

read more

I have been giving our kitchen a little love lately. The first thing I did was swap out our old kitchen faucet with this beautiful BLANCO EMPRESSA™ Semi-Professional Kitchen Faucet and matching BLANCO EMPRESSA™ Soap Dispenser 


I absolutely love this faucet. Its beautiful design and clean lines are just the look I was going for in my modern farmhouse style kitchen. I went with the stainless steel option but they have so may to choose from: oil rubbed bronze, polished nickel, and polished chrome are all great choices for this faucet! The pull-down dual spray ability and the high pressure make me feel like I’m in a professional kitchen!


The installation was very easy and straight forward too. It took us about 30 mins to hook it up and then we were in business with this new beautiful faucet and soap dispenser 
This is the first time I have had a soap dispenser built into my sink and I have to say I’ll never go back! I love how clean and streamlined it makes my sink area look. I also love how they have so many options of styles and finishes for their dispensers, so no matter what faucet you pick there is a matching soap dispenser to pair it with!
It’s amazing how just a simple swap of my faucet has given my kitchen such a new and fresh look!!
Check out my faucet/soap dispenser and all the other beautiful options that Blanco has to offer!!
-Grey Birch Designs-


How to Build a Picture Ledge

DIY Projects

read more

I love using a picture ledge to display my photos and artwork. Check out my latest DIY and see how you can make one for less then $40!!

Don’t forget to subscribe to our YouTube channel so you won’t miss any of our videos!

-Grey Birch Designs-


3 Ways to Style Your Fireplace Mantel

Seasonal Decor

read more

Decorating your fireplace mantel can be tricky, and if you’re like me and want a new look for each season/holiday it can get expensive. I have come up with three ways you can style your mantel using the same core anchor pieces, making it easier to switch out the smaller decor from season to season!


Everyday Look

farmhouse styled fireplace, arched mirror, wood sign, glass vases

First let’s establish our anchor pieces that will be used throughout all the different looks. My biggest focal point is the larger mirror. I chose this one because it is a perfect piece to use in layering without being distracting. The wood frame and simple design draws your eye in but doesn’t distract from the sign that’s in front of it. The other anchor pieces I have are the vases with tall flowers on each side. This works great to get everything symmetrical, making it ok to keep the mirror and large sign off-center because the vases bring balance to the whole display. Finally, for this everyday look, I added the “home” sign and wood beads as decor. They look great and are easy to switch out!


Spring Look

Spring farmhouse styled fireplace, arched mirror, large sign that says "Alright Spring do your thing" white tulips, glass vases

For my spring look I swapped out my “home” sign for this larger spring sign, and added some wood beads on the vases. I also found these cute glass bottles at the Target dollar spot and put some real touch tulips in each one to give it a spring touch. By keeping the anchor pieces I didn’t have to change a lot but got a whole new look for spring!!

Summer Look

Summer farmhouse styled fireplace, arched mirror, wood candle sticks, glass vases with faux greenery, boxwood wreath

For my summer look I did something a little different than before. I love lots of greenery in the summer so I wanted to show that. I changed the cotton stems I had in the glass vases to some faux seeded eucalyptus, added some faux succulents inside 2 different color mason jars, added a faux boxwood wreath over my mirror, and added some fun vintage candle sticks and candles. Just like before, I kept my anchor pieces the same and incorporated smaller/different decor for a new season and fresh look!!

-Grey Birch Designs-


DIY’s on Monday


Vignettes on Tuesday


Front Porches on Wednesday


Mantels on Thursday


Recipes on Friday


How to make a Wood Tile Sign

DIY Projects

read more

Tile signs are so popular right now in home decor and I have put together an easy DIY tutorial so you can make your own! Check out my latest video!!

Don’t forget to subscribe to our YouTube channel so you won’t miss any of our videos!

-Grey Birch Designs-

My Twins Room Make-Over

DIY Projects

read more

The room make-over I did for my twins last month has to be one of my favorite projects so far this year. I didn’t really change a lot of stuff but the room was fully transformed and it looks like a completely different room!!


The first thing we did was paint the walls and add board and batten around the whole room. It was a pretty easy project because we did faux board and batten by just using strips of MDF to make rectangle boxes on the wall. This project made a huge change and really brightened up the room (check out my Instagram highlights to see how we did it) 
 
 
The next thing we did was paint the top of the wall a pretty light grey. It’s called Icy Avalanche by Olympic It’s one of my absolute favorite light grey colors and it gave this room the clean, classic look I just love!
 
 
Finally we changed the bedding to my absolute favorite bedding by Beddy’s
We picked the Modern Grey all cotton Beddy’s sets for both boys and put their Check Mate and Grey Rugby blankets at the foot of the bed. These bedding sets are a game changer for us. My boys easily make their beds in less than 10 minutes everyday without me even asking!! So not only are they cozy, high quality, and super cute, but they make life easier! That’s definitely a mom win in my book and I feel they are completely worth every penny!
 
As far as the furniture, we kept it all the same and just moved things around. I added in a few pieces of decor that I had in other rooms to freshen it up a little more. All in all it was a project that I’m very happy with and it took us less than a week from start to finish. Now my boys’ room is one of my favorite rooms in the house!
 
Check out my before and after!! 


After                       Before
 
One thing I have been thinking would be so fun to add to my youngest sons room is a mural!! I have found some that I absolute love from a company called Photo Wall! They have a HUGE selection, the headset part is narrowing down my favorite ones! Check them out here:
 
 
-Grey Birch Designs-


Peel and Stick Wallpaper

DIY Projects

read more

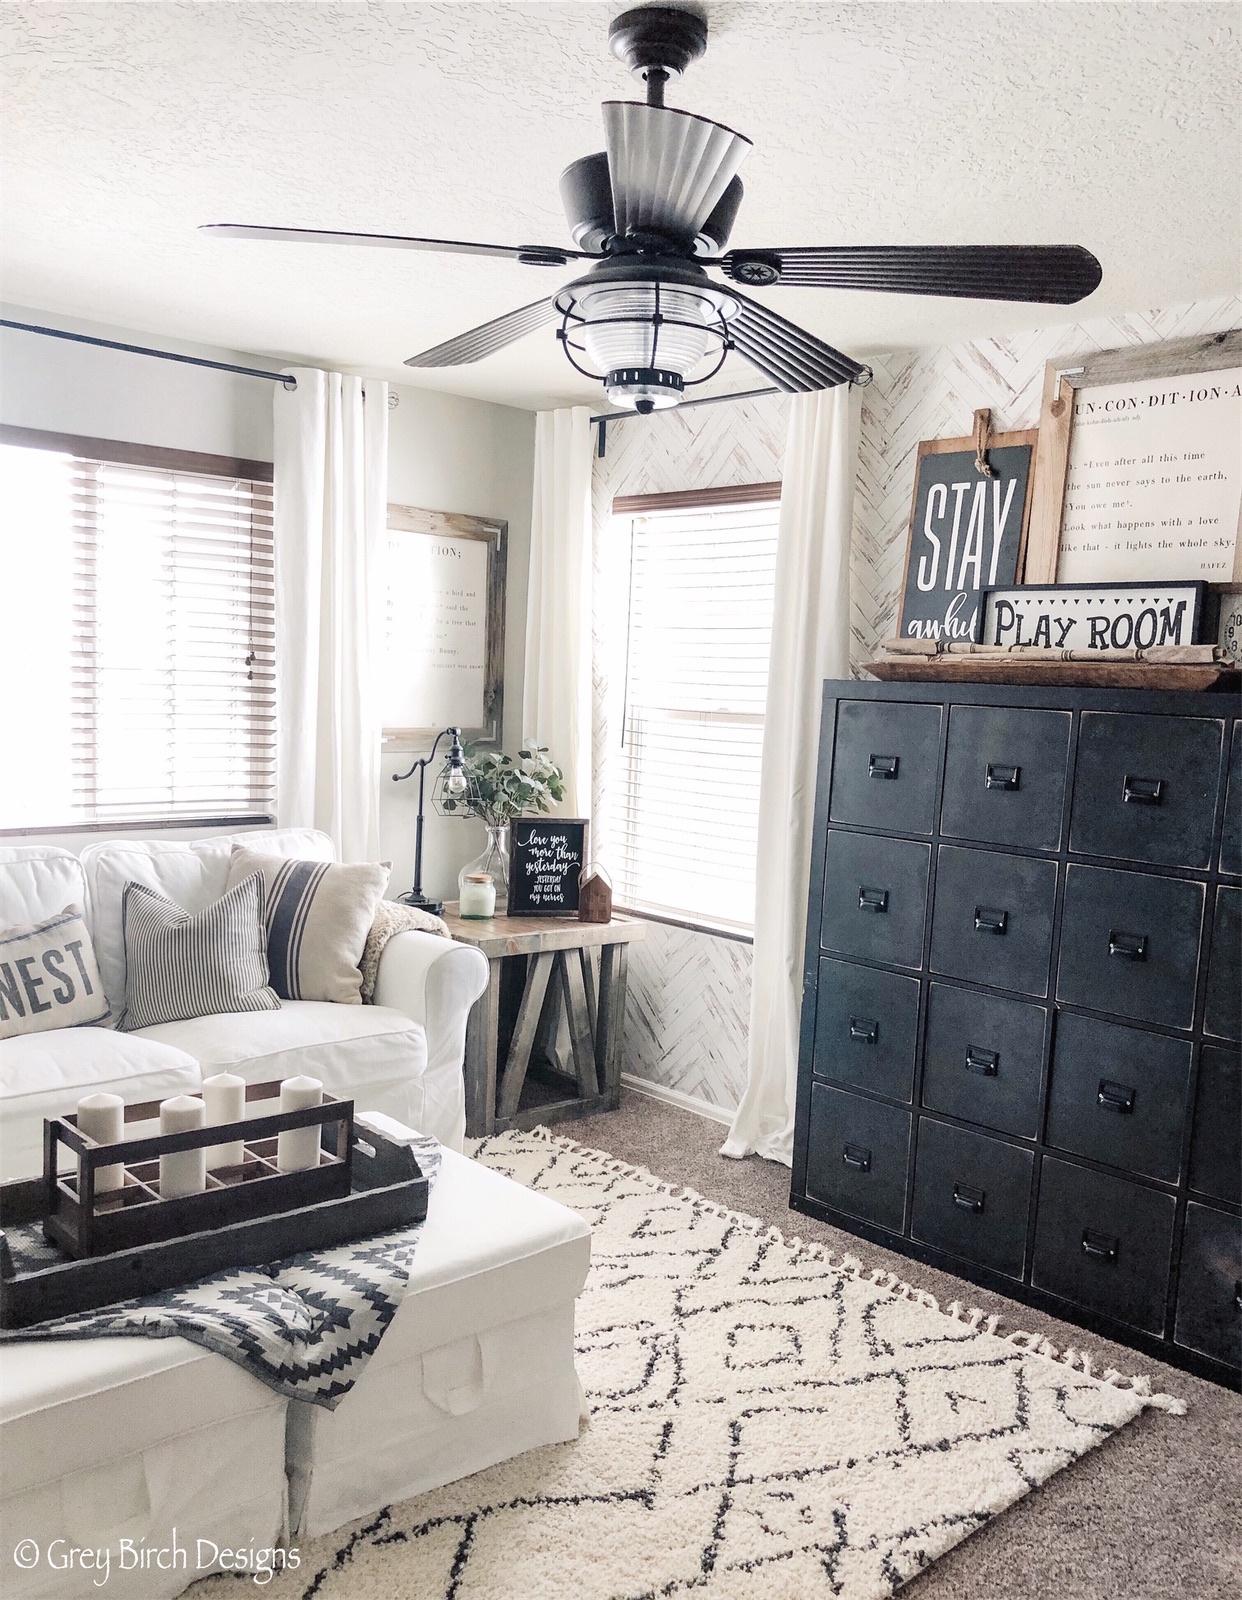
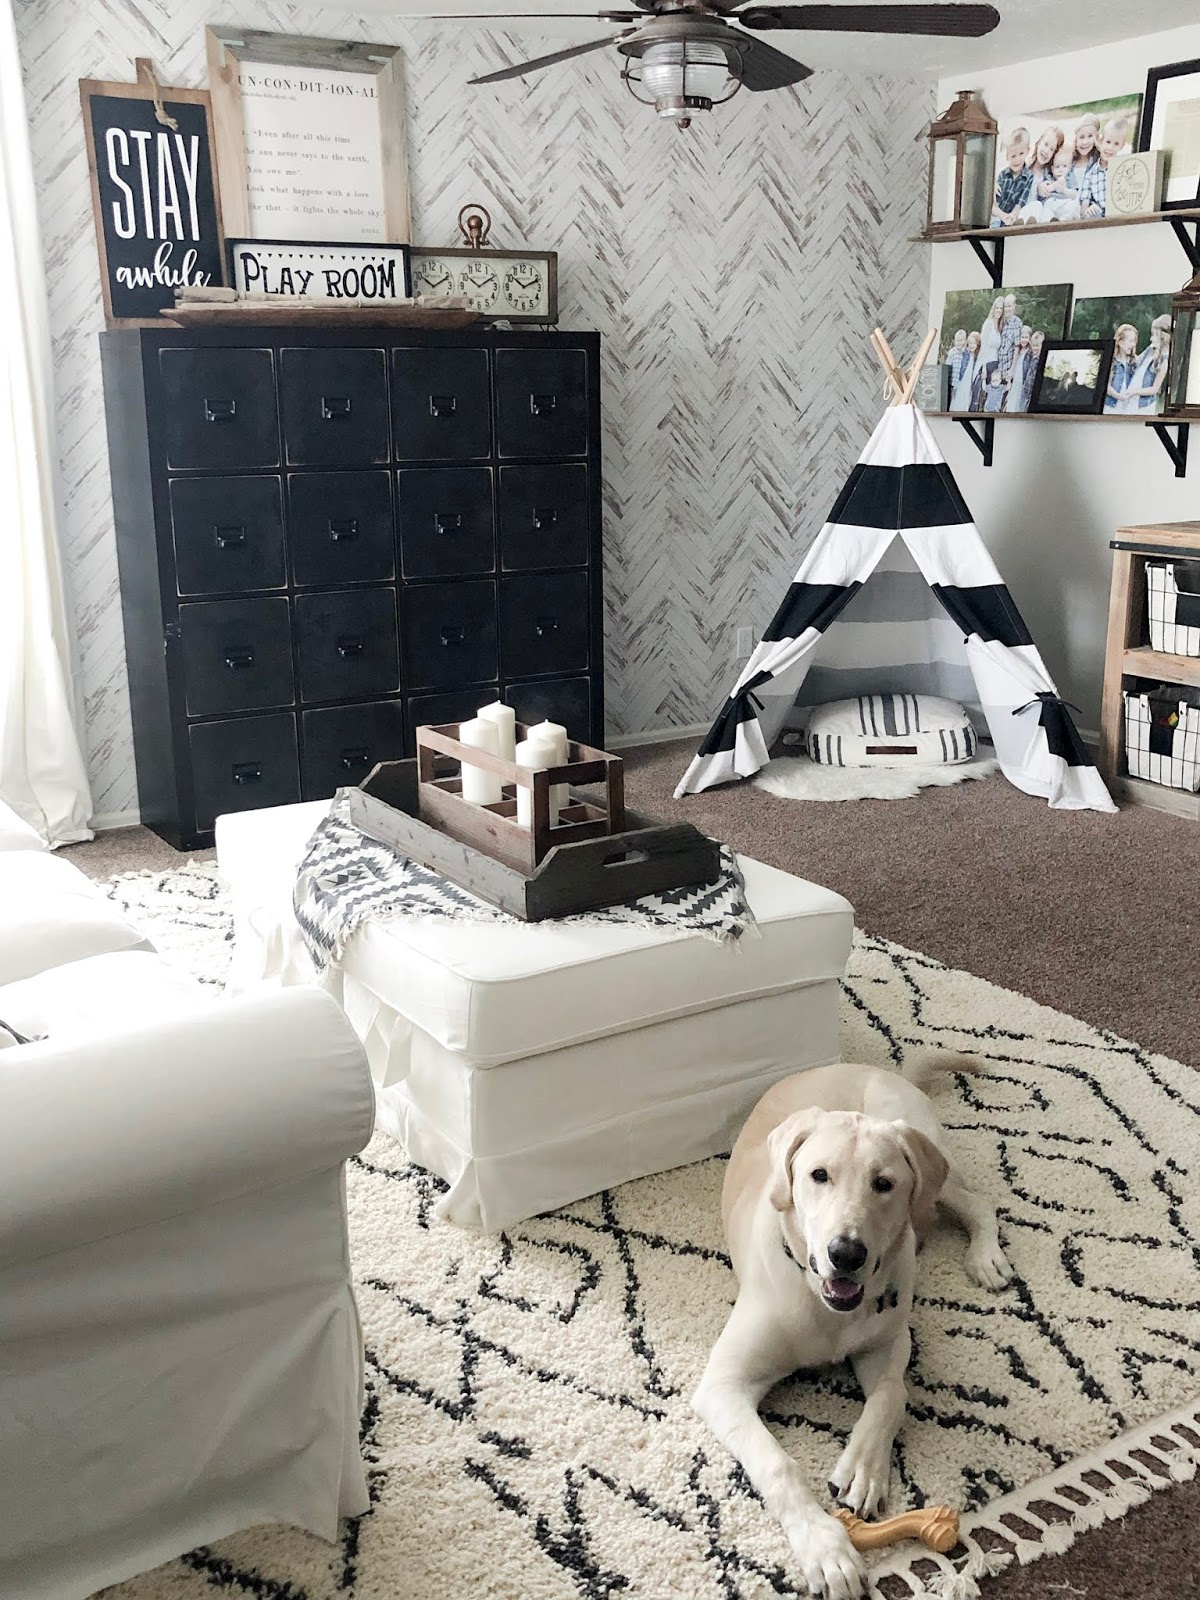
One of my new favorite ways to give a space a punch of interest is with a feature wall. You can do this many different ways, using materials such as paint, wall treatments, shiplap, etc. There are so many great options out there these days, but my new favorite is wallpaper, and not just any wallpaper, but this beautiful peel and stick wallpaper by Rocky Mountain Decals!!
I can’t get over how beautiful it is and the quality is amazing!! I’m so excited to partner with Rocky Mountain Decals on my loft/playroom update! It was so easy to do and took no time at all. With the help of my husband, I transformed this space from plain and boring to spectacular! 

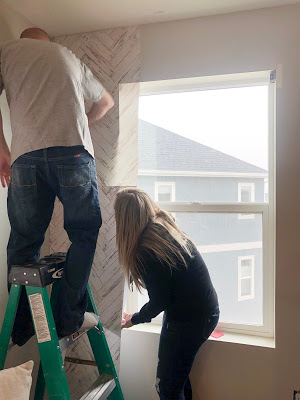
Check out the process of how we installed this peel and stick wallpaper in just a couple hours!
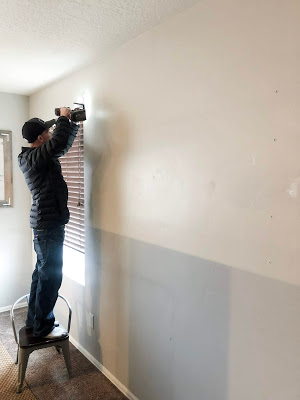
The first thing we did was prep our wall. Since this is removable wallpaper, they recommend that your walls be painted in with semi-gloss or gloss paint. Since our wall was already painted with semi-gloss, all we had to do was fill the nail holes and take down our blinds.
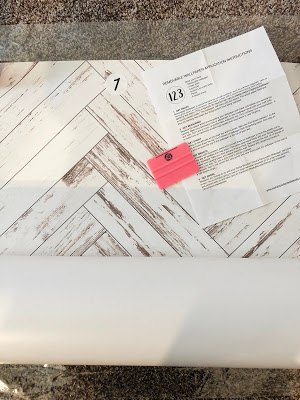
Next, we lay out the strips of wallpaper. They have made it so extremely easy by numbering each piece and rolling it up in order, so you know where to start and what comes next!!
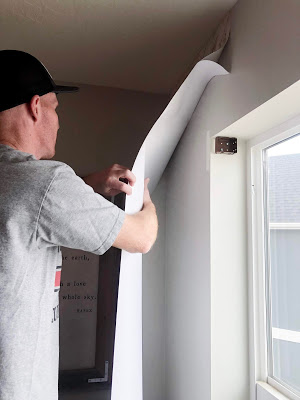
Now it’s time to get your first piece up on the wall!! We started at the top and pulled off the backing just enough to stick it to the top. This was key to make sure we had it all lined up straight.
This next part is definitely a two person job. You will need one person at the top smoothing the wallpaper down while the other person is slowly pulling the backing off the wallpaper. To eliminate bubbles, start smoothing down the paper from the middle and then working your way out to the sides.
 
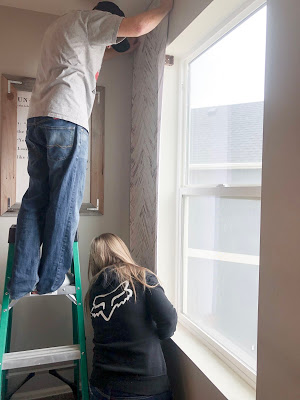
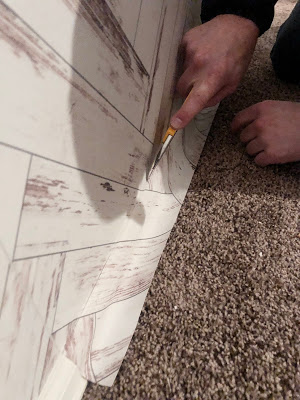
One thing that is important to remember if you are wallpapering a wall that has a window is to pretend it’s not there and wallpaper right over it. Once you are done you can come back with a razor blade and cut your window out. This will give you the cleanest and most seamless look. The same goes for the bottom of each strip of wallpaper. You will have a couple extra inches at the bottom. Just let that rest on your baseboard and when you’re done you can come back and cut it off!
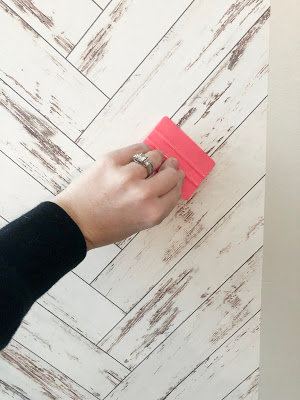
Another thing that I loved that made this install so easy was the fact that they have these handy little tools to help get any air bubbles out. If you find a bubble, all you do is take this tool and push the bubble to the sides, and just like that it’s gone!!
And that’s it! Pretty easy, right?!? I’m absolutely in love with my new wall, and thanks to Rocky Mountain Decals this room went from an unfinished room that drove me nuts to one of the coolest spots to hang out in the house!!
Check out Rocky Mountain Decals and see all their beautiful designs!!
-Grey Birch Designs-

DIY Farmhouse Beads

DIY Projects

read more

How to Make DIY Farmhouse Beads by GreyBirchDesigns on Jumprope.

Easy DIY Sign

DIY Projects

read more

Stuck on what to do with left over wallpaper thats to cute to throw out or looking for a budget friendly statement piece??? Check out my latest DIY project

Don’t forget to subscribe to our YouTube channel so you won’t miss any of our videos!

Get on the List!

sign up to the newsletter to get the latest updates