


read more
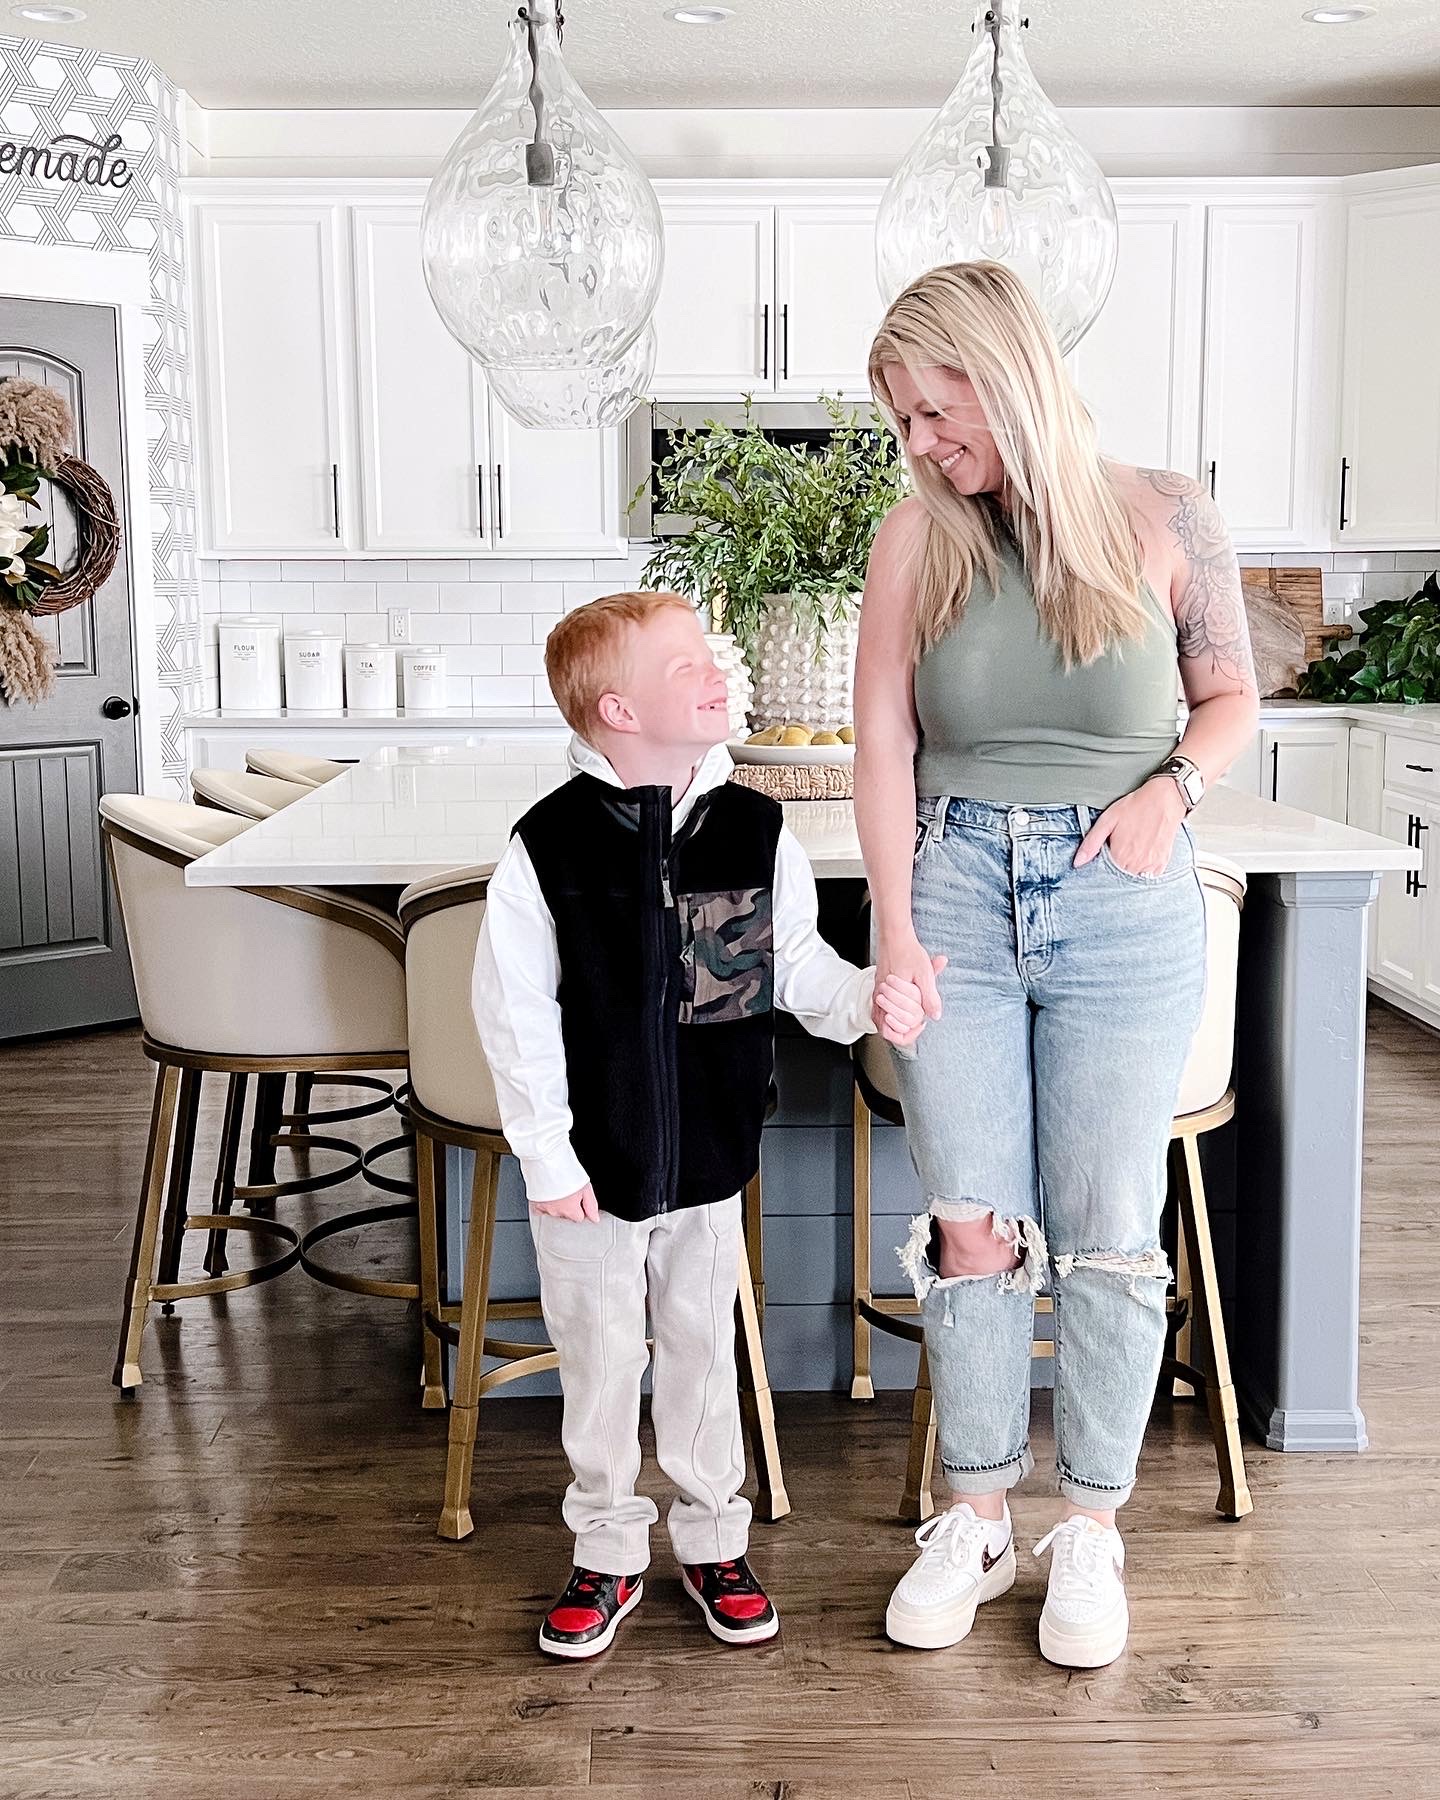
This year I did all my back to school shopping at Walmart. I found some awesome clothes at incredible prices and I want to share my back to school round up with you all!

My favorite line at Walmart this year is the Free Assembly brand. The styles are super cute and the quality is really impressive. I bought a bunch of clothes for my youngest son Travis but my favorites are these sweatpants, hoodie, and fleece vest. You can shop this look here.

I found some super cute Free Assembly dresses for my teenage daughter. I also found these awesome $9 jeans that come in a bunch of colors, and some shoes that are similar to ones I love from high end designers. You can shop these Walmart finds here.

In the past I’ve only shopped Walmart for back to school supplies but now I’m so impressed with their clothes and fashion. I’ll definitely be doing all our kids’ back to school clothes shopping for years to come!
-Grey Birch Designs-
*This blog post is sponsored by Walmart and contains affiliate links*
read more
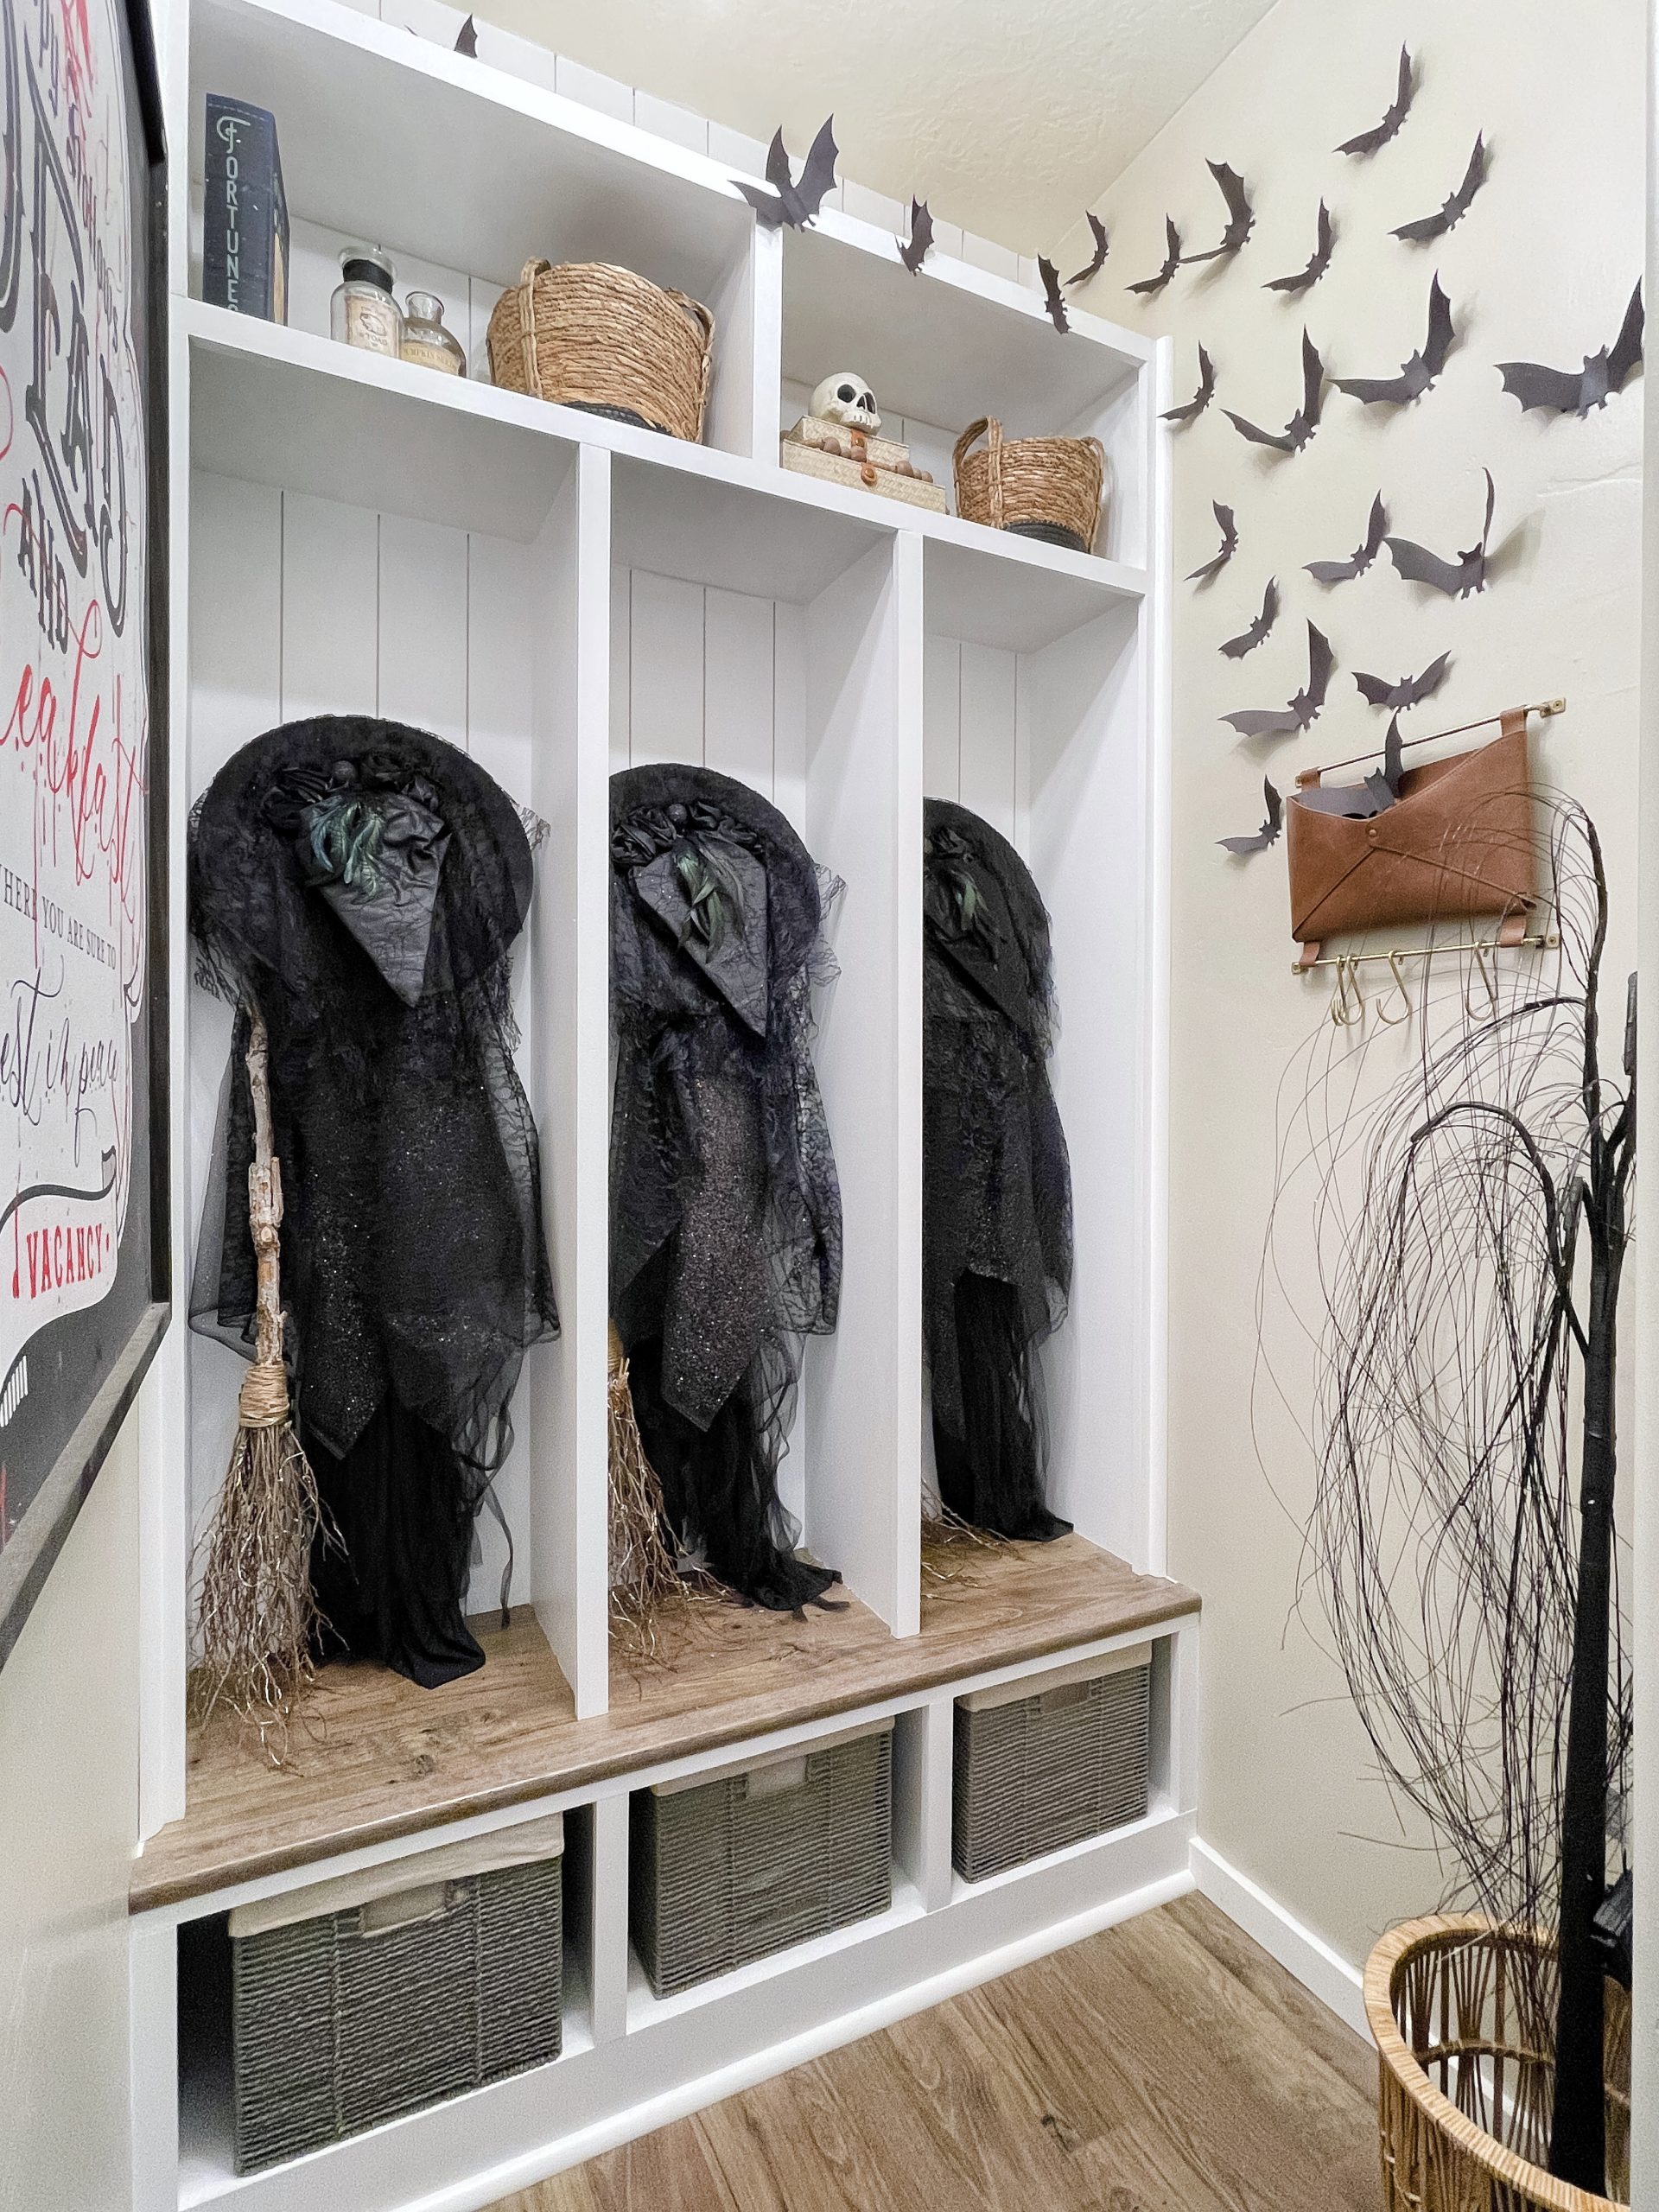
Halloween is a big deal at our house. I tend to go big with the decor because my kids get so excited!! I have wanted to decorate a mudroom for my kids for years, the problem is until about 6 months ago we didn’t have a mudroom. Our home’s floorpan didn’t have come with one so in February of this year we decided to convert our hall closet into a much needed mudroom! You can checkout that project here! Now because of this I finally get to create the spooky mudroom I have been wanting to do for years!

The first thing I did was look for some witches capes and hats, I wanted these to hang on the hooks of the lockers in the mudroom. I found the perfect ones at Walmart that were super affordable, but to dress them up just a bit I had a sparkly tulle and black lace cut to size from the fabric department at Walmart.
I also wanted to add some spooky decor to the top of the lockers so I grabbed a faux skull and these adorable baskets. These are great because they match my Halloween decor but the are also practical storage I will continue to use all year long! Finally I add some bats to the wall and a seasonal sign. I also made some DIY witches brooms that were so easy and fun to make! Check out how I made them here!
The best part of this whole mudroom Halloween makeover was my kids had no idea I was doing this while they were at school and when they came home they were so surprised! My littlest one had the biggest smile on his face when he went to put his backpack away. You can watch my video here to see how I put this whole space together!
I had a blast decorating this space and my kids loved it too. Halloween time is such a fun time of year and we celebrate it all month long around here!!
-Grey Birch Designs-

read more
Growing up in sunny southern California where every day is 75 degrees was something I definitely took for granted. These days I love being outside in our backyard, watching our kids play, and having dinner outside on the patio. Now that we live in Utah we can’t do this year round, only a handful of months a year. This year I decided to try something that would make it possible to enjoy dining outside a bit longer, even through the cooler months of Fall!
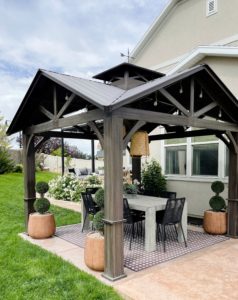
We built our outdoor dining area a couple years ago – I can’t believe how far the backyard has come! We had the cement pad poured and built a covered gazebo with a dining set underneath. I decorated the space with outdoor string lights, hanging basket lights, a cute rug, and some real and faux plants. The one thing I didn’t until this year was an outdoor heater.
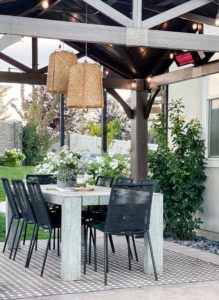
I hesitated in the past because all the heaters I have seen before were larger and took up too much space. Since this area is only 10ft x 10ft, space is a huge factor. That’s when I came across the Dimplex DIRP15A10GR. It’s an electric plug and go mountable heater! It’s the perfect solution for this area. We mounted it inside the roofline of our gazebo and it was super easy to do. We just plumed it in and we were ready to go! This particular model is also remote controlled, which was a huge selling point for me.
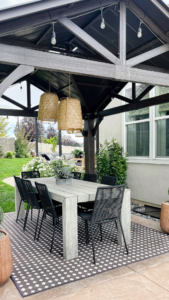
One of these units is enough to heat a 10ft x 10ft space so it worked out perfectly! This will now make it possible to enjoy our outdoor dining space through the Fall and I could’t be happier about it. I see lots of chili and cornbread, soups, and stews being enjoyed out here this year!
If your family is like ours chili is a staple when the weather cools down and there is only one recipe I have that everyone loves, even my picky eaters!
-Grey Birch Designs-
Chili Recipe
Ingredients
- 1 pound ground turkey or beef
- 1 onion
- 1 clove garlic, minced
- 2 15-oz. cans diced or crushed tomatoes
- 2 14-.5 oz. kidney cans, rinsed and drained
- 1 15-oz. can beef broth
- 3 tablespoons brown sugar
- 2 tablespoons chili powder
- 1 teaspoon ground cumin
- 1 tablespoon unsweetened cocoa powder
- 1/2 teaspoon freshly ground black pepper
- 1/2 teaspoon kosher salt
- Sour cream and shredded cheddar cheese for topping!
Instructions
- Heat 1-2 tablespoons olive oil in a large pot over medium heat. Saute onion, garlic, and ground turkey until meat is cooked through.
- Add salt, pepper, cumin, chili powder, brown sugar, and unsweetened cocoa powder. Add the tomatoes, beans, and beef broth.
- Heat to boiling and then reduce to a simmer (uncovered), stirring occasionally, until thickened as desired (I like it about 30-40 minutes)
- Top with sour cream and shredded cheese, serve hot with fresh cornbread!
Notes
Recipe modified/inspired by Our Best Bites
read more
One of the most important elements of interior design and many times overlooked is window treatments. They are not only necessary for privacy, but they can also make a major statement and bring your home’s design to the next level.

In my home I installed Polywood® Shutters from Sunburst Shutters on just about every window. I love the clean, modern lines that fit my style perfectly.This type of window treatment brings a classic elegance to each room that will never go out of style.
The Polywood® Shutters are the perfect choice because they are 100% custom made to fit each window. They are also made in the USA and specifically engineered with a durable recyclable solid wood substitute; so they won’t chip, crack, warp, or split. 
The installation was easy and painless. Sunburst Shutters sent out someone to take all the measurements and place the order. Then when my custom shutters were ready they delivered and installed them. One feature that sets Polywood® Shutters apart from other plantation shutters is they are extruded with an exclusively patented weather stripping, which adds another layer of window insulation. We all know that windows are a primary source of heat gain/loss inside a home, but these shutters have weather-stripping along each side to provide optimal window insulation, blocking more temperature and light than any other shutter.

This was a big selling point for me because my daughter’s and twin son’s rooms at the front of our home are greatly affected by the heat of the summer sun and the cold of the winter
We have now gone through our first winter with these new shutters in our home. I can say from first hand experience that there was a noticeable temperature difference in my kids’ bedrooms. They are a world of difference from the basic blinds we used to have! 
There are a ton of window treatment options out there and I’m super happy with my decision.
 These new shutter are the perfect fit for my home and my design style. Plus they are a true classic that never goes out of style!! Now I’m on to the next design project!
-Grey Birch Designs-

read more
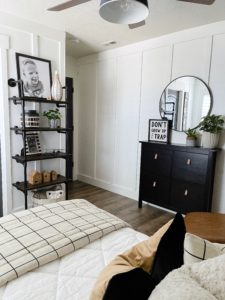
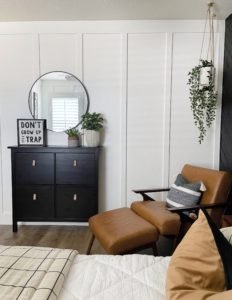
My youngest son recently asked me to turn his room into a “Big Boy” room so he could be more like his two older brothers. I decided to make his room more sleek and modern in a few ways. First, I wanted to update his wood herringbone feature wall behind his bed. I originally installed the feature wall several years ago but the wood had a very rustic feel. To make the wall more sleek and modern I painted it a dark satin black. It was actually pretty fun and easy to do.
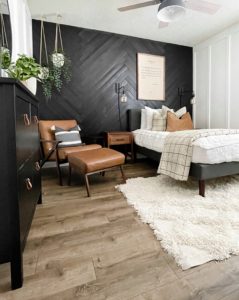
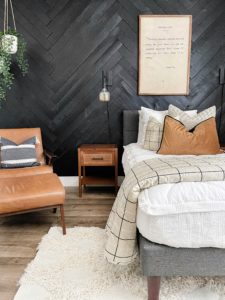
Next, I decided to upgrade some of his furniture and decor. He previously had a lot of hand me down furniture from his older brothers, so he was super excited when I told him he was going to help me pick out some new big boy stuff for his room. I’ve always been a big fan of the Better Homes & Gardens line at Walmart because it’s well designed but still very affordable. It makes a lot of sense to have budget friendly furniture and decor in a kid’s room so it can be easily changed out as he/she matures. I knew I wanted an upholstered bed to compliment his new sleek black wall. The Knox Upholstered Platform Bed has clean simple lines giving the bed a masculine look, but the upholstered headboard gives it a soft feel that’s perfect for a little boy. The bed is also a great size. It adds dimension and texture to the room without taking up a lot of space.
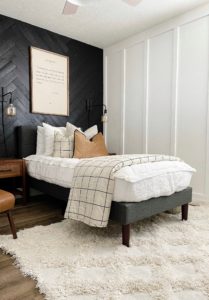
Then I switched my attention to his rug. I wanted a rug that was soft for him to play on but also strong enough to handle some 7 year old punishment! I also needed the rug to be a neutral color with a simple pattern so it didn’t compete with the other colors and textures in his room. I went with the Trellis Shag Area Rug which has a great soft raised pattern that works well with the bed.
Another area of my son’s room that gets a lot of use is his reading nook. He has a thin cabinet for all of his books that fits tightly up against the wall. He also has a comfy leather chair to read in. I wanted to dress up this space so it stayed comfy and functional. While I was shopping I found this cute 28 inch Round Metal Wall Mirror to hang above his book cabinet. I added a few hanging plants to add in some life and greenery, as well as a cute little sign to fill out the space. This was a really fun and easy weekend update that we were able to complete as a family. We spent one day prepping and painting the feature wall, and another day putting together all the furniture and decor. Travis even did his best to help since he was so excited. Now he has a “Big Boy” room that his older brothers will be jealous of for years to come.
-Grey Birch Designs-
This post is sponsored by Better Homes & Gardens at Walmart
read more
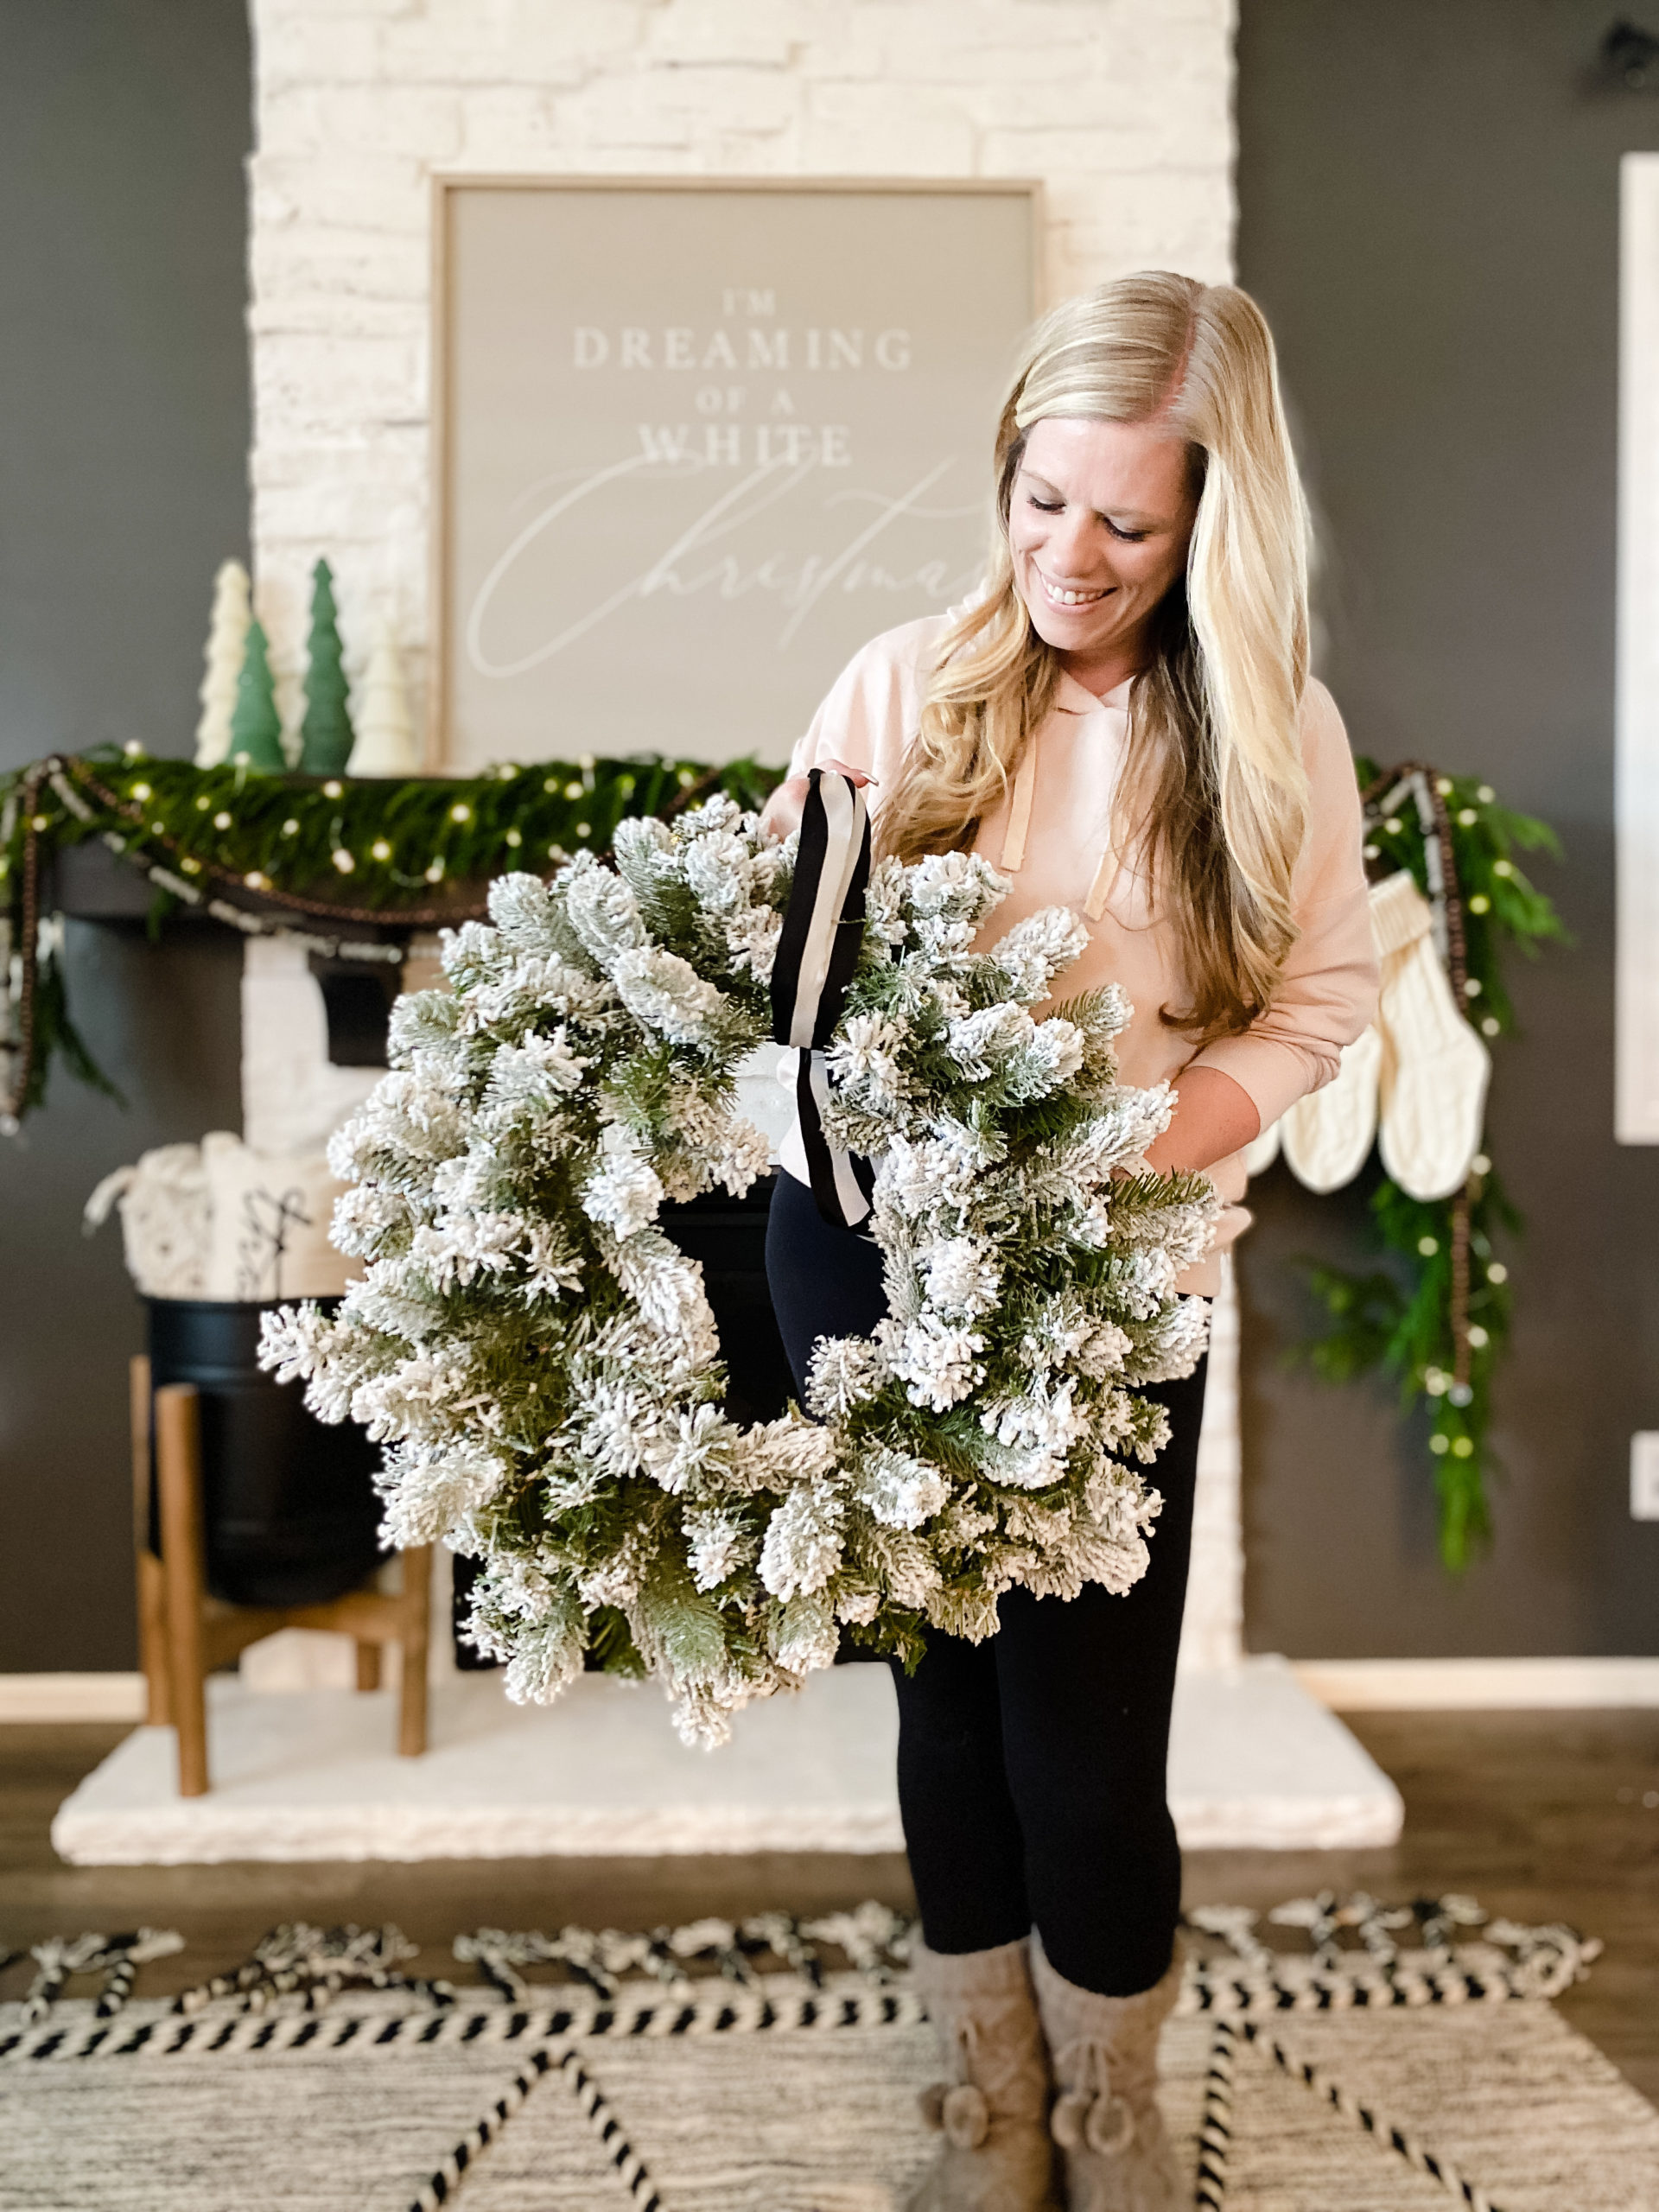
Each year when the holidays roll around I always find that my seasonal decor style changes a bit, but I really don’t want to invest in all new decor year after year! Last year I wanted flocking on EVERYTHING, this year not so much. So when I opened up my holiday storage bins and found just about every faux greenery covered in flocking I knew I had to come up with an easy solution that wouldn’t break the bank!


I had these really nice pre-lit Holiday wreaths I love to hang over the windows in our sunroom, but I wanted to add more natural elements and greenery to balance out the flocking on the wreaths and give them a more natural organic look and less of a white Christmas farmhouse look this Holiday season!
I found some faux greenery stems and mini pinecones that worked well with the flocked wreaths to give me the look I was hoping for! All I needed were some zipties, wire cutters, and Krazy Glue for this project!
Step 1:
First I took my plain flocked wreath and pushed back all the branches so I could get to the metal frame of the wreath. Then I laid down these faux pine leaf stems with baby pinecones (they are larger of the two I picked out for this project) and attached it to the frame with a couple zipties.

I repeated this step on the opposite side on the wreath, overlapping the base of the greenery stems just slightly so they flanked the bottom of the wreath and traveled up towards the top.
Step 2:
Next I took my second style of faux stems (a thicker pine with small berries on it) and layered them on top of the ones I already attached to the wreath. I did the same thing using just a couple zipties to secure the branches to the frame of the wreath.

Since the faux greenery I used is traditionally used in things like vases and containers, they have long stems on the bottom that I didn’t need in my wreath. I took some wire cutters and simply cut off what I didn’t want!
Step 3:
Now that I had the greenery secured it was time to fluff the wreath. I wanted the flocked branches and the new stems to look like one so I bent and moved the branches as needed to blend them together in the wreath.

Step 4:
Next came the icing on the cake, that took the wreath from plain to Wow! I cut up pieces of faux frosted eucalyptus and placed then randomly in the wreath. To keep them in place I used the Krazy Glue. It works awesome because is has a quick grab time, about 20 seconds, and it bonds to anything!! I placed a small bead of Krazy Glue around the frosted eucalyptus and held it in place until it grabbed!

Step 5:
I loved how the faux greenery with the baby pinecones looked in my wreath but it needed more of the little pinecones, so I took more of Krazy Glue and added a handful of these little pinecones around the wreath to bring in a more organic look. I added a pea size amount to the bottom of the pinecones and attached them to random branches in the wreath!

This was a super easy project for the holidays that I tackled in an afternoon and it completely changed the look of my old plain wreath! Thanks the the versatility of Krazy Glue I was able to get the look I wanted for my holiday decor this year without having to go out and buy all new wreaths!
-Grey Birch Designs-
read more
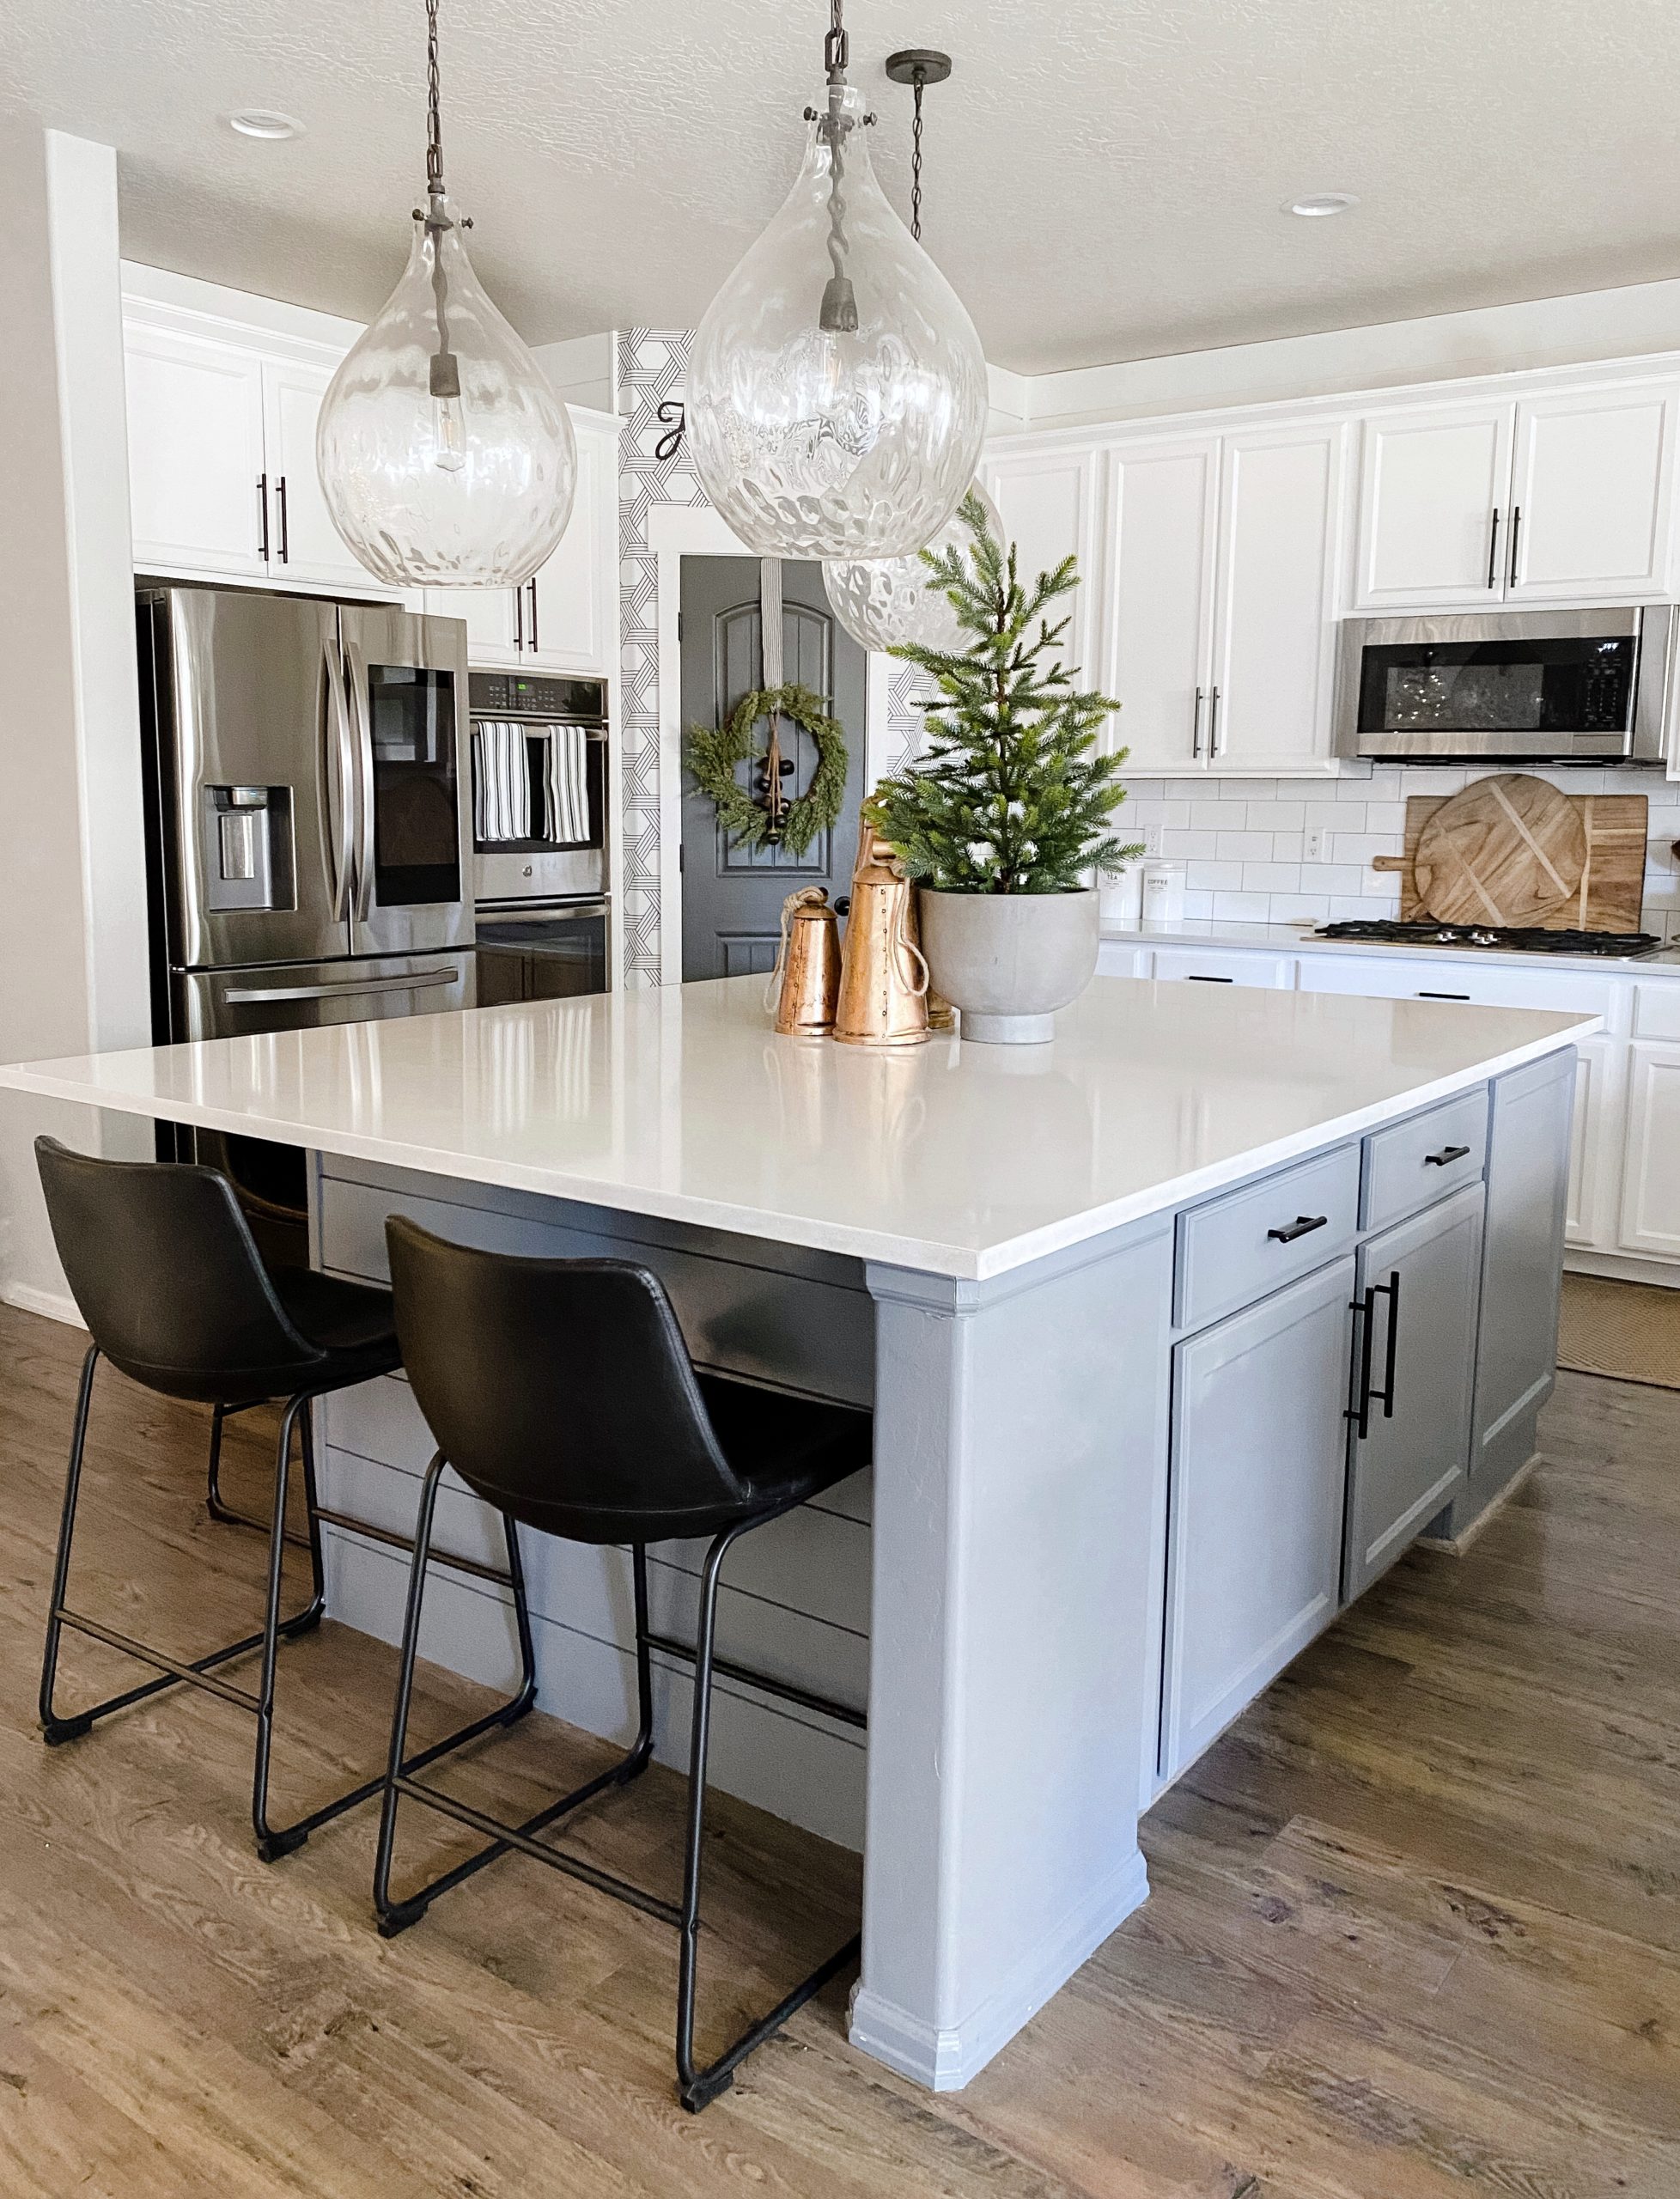
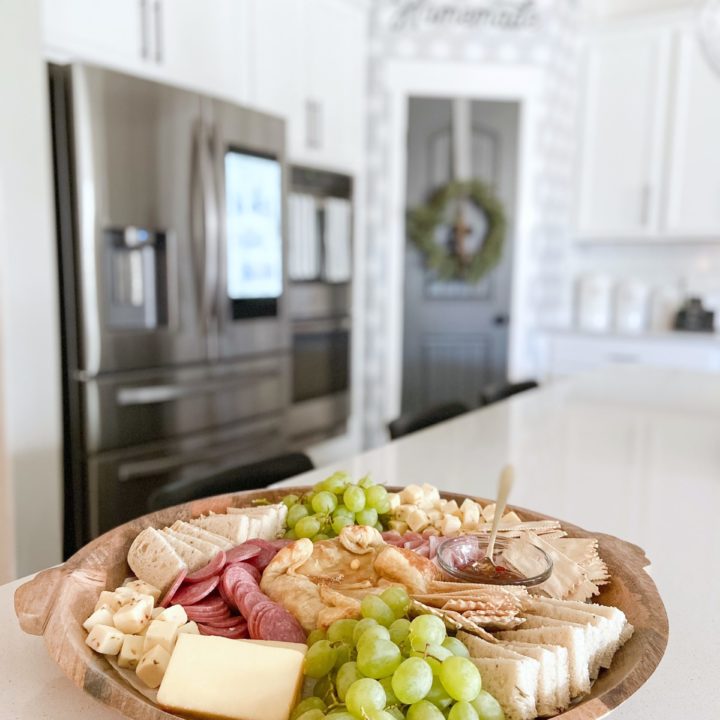
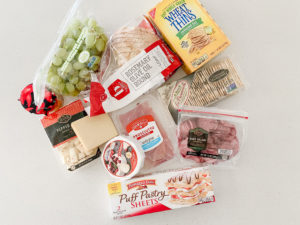
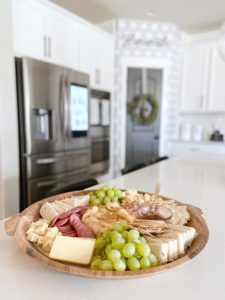
With the holidays around the corner, one of my favorite things to make in the kitchen is a charcuterie board. There are so many different varieties but my favorite is the traditional cheese and meat board. Before I head off to the market, I like to make a list of everything I need. My Samsung refrigerator has a super cool voice controlled assistant called Bixby that makes things really easy. I say “Hey Bixby, add Brie cheese to my grocery list” and it does the rest. Then I can quickly send the list to my phone and head out the door. On the off chance I forget to send the list, I can view the inside of my refrigerator from my phone at the market. Pretty cool!


When I build a charcuterie board I like to include fruit, crackers, meats such as prosciutto and salami, and a variety of cheese. My favorite is baked brie. For my baked brie recipe you’ll need:
Charcuterie Board Baked Brie
Brie cheese wrapped in a puff pastry with added sweetness from brown sugar, jam and a hint of maple syrup!
Ingredients
- One sheet of puff pastry dough
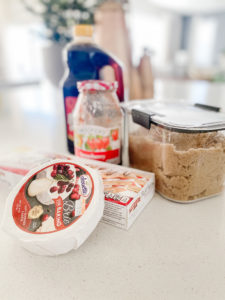
- One round brie cheese
- 2 table spoons strawberry jam
- 1 table spoons brown sugar
- 1/4 cup maple syrup
Instructions
- Pre-heat the over to 350 F
- Slice the top off the brie (optional but it will help the puff pastry stick to the cheese)
- Place the brie on top of the puff pastry. Spread the jam on top of the brie and fold the dough over it
- Sprinkle the top of the dough with brown sugar and maple syrup
- Bake at 35oF for 30 minutes.
Notes
Let cool for 5-10 minuites before serving. Place in the center of your charcuterie board and add fruit, crackers, meats, jams and other cheeses to finish builded your board!
This recipe is delicious! I have a lot of fun making these charcuterie boards with my family and awesome appliances like my Samsung refrigerator make it stress free! To read more on some of the awesome kid friendly features our Samsung Family Hub Refrigerator has to offer check out my blog post here
-Grey Birch Designs-

read more
This is a project that I didn’t think we would ever see finished. When the plans we had to build a new home fell through (thank you COVID) we decided to finish our basement! Throughout this huge project I’ve been asked the question “Are you happy you didn’t move?’ and I can honestly say it was the biggest blessing in disguise!! It was hard to see at the time, but now sitting here I feel so incredibly happy for where we are!!
For our basement we knew we wanted to build 2 bedrooms, a bathroom, a kitchenette, a living room, and a game room! It was a bit overwhelming to think about all the work but also super exciting. We knew it wasn’t going to happen over night, but I’m excited to say we are officially finished with phase one of our basement build!
